Monday, January 28, 2013

Easy Peasy Fudge

I've never had a lot of success with fudge. It always crystallizes or doesn't set. Also, I never have condensed milk in my cupboard so it's not the sort of thing I can try out again impromptu. Going out to buy a can of condense milk knowing I am likely to waste it makes me feel uneasy to say the least!  I've been thinking a lot about 'old fashioned' home made sweets lately thanks to an upcoming birthday and what is probably the tightest budget I've had to work with yet! When I discovered this recipe on pinterest this morning I knew I had to give it a go...and it worked!!


Here's the original recipe and also the recipe halved if you don't want a big batch. Perfect if you just want to try it out and not risk a whole 4 cups of icing sugar...

Recipe 1
500g Icing Sugar 
2/3 c cocoa
1/4tsp salt
1/4c milk
2 tsp vanilla
1/2 c butter or marg

(Makes approx 36 pieces)

Recipe 2
250g icing sugar (2c)
1/3 c cocoa
pinch salt
2 TBLSP milk
1 tsp vanilla
1/4 c butter or marg 

(Makes approx 18 pieces)

Sift icing sugar and cocoa into a large bowl. Add salt.
Stir in milk and vanilla.
Place butter on top (don't melt it first)
Microwave 2 mins and then beat with a wooden spoon until smooth. You will have to work quickly.
Spread into slice tin and refrigerate 1 hour ( or 30mins if doing half batch.)

*You can add nuts or other extras like dried fruit at the final mixing stage.
*You can use mini muffin liners/tray instead of slice tin.
*If making half mix only spread out to half the length of your tray...easy one to forget!

In yummery: My daughter asked for this to be made for her party...enough said! This was an instant hit.
It doesn't use condensed milk so this is more frugal than regular fudge and is easily made gluten and lactose free.

Nothing bad to say about this recipe :)

May your nest be blessed,
Lisa


Friday, January 25, 2013

Off the Page


I teach 2 of my 3 kids (both teens who don't fit the system!) at home. When they were younger I worked off my own curriculumn but now they are older and one's doing exams we study via the NZ Correspondence School (Te Kura.) There's still a lot of extra teaching to be done in and around the subject wok they send and I like to do what we call 'off the page' work. Usually we focus on the holidays (St Patricks, Mardi Gra's etc) but this term I'm introdcing this box...

The envelopes are all made from magazine pages as you can see but contain half hour activties covering everything from survival skills in a disaster to scripture and butchers diagrams of meat cuts.

The idea is that they will pick an envelope to carry on with if I am busy (usually with the other sibling) so they're not just sitting and waiting. It will also encourage independant working on topics not in the NZ curriculmn. That's one of the things I love about home teaching and tt's cost nothing other than time and printer ink. That's a win/win in my book!

May you nest be blessed,
Lisa

Feel free to drop in on the other participants and enjoy their thrifty sharing too.


Sunday, January 20, 2013

Frugal Fruit Jellies

These are delicious, healthy and frugal! Perfect!

I made these fruit jellies using this recipe for inspiration . I adapted it as I often do and the results were these wonderful jewel like jellies that I could easily eat all by myself!


My version of the recipe goes like this:

220 ml of freshly squeezed orange juice
6 TBSP of gelatin powder
4 TBSP of honey

That's it for the ingredients!

  • In a pot whisk together all the ingredients until there are no lumps. (Don't worry if it looks a little brown at this stage, it sets orange.
  • Stir over a low heat until the honey and gelatin have dissolved then pour into molds.
  • Freeze for 10 minutes then they are ready to eat.

They stay firm when store at room temperature although I am not sure how long for and I doubt ours will last long enough to find out!

I used mixture of ice cube squares and chocolate molds.   The most successful of these was the bar shaped chocolate molds and the ice cube tray. I found that the other molds were to shallow and the jellies didn't hold up to being removed from the mold. No doubt deeper molds would have worked. I don't see why this mix could have been poured straight into a shallow dish and then cut into squares if you want even quicker results.


In yummery: These are delicious and definitely a recipe to keep. There's lots of scope to try different juices and sweeteners. I did read somewhere that pineapple juice reacts badly to gelatine so I wouldn't recommend pineapple. 
There is no added sugar, all the sweetness came from the oranges and honey. The over-riding taste for these was honey so next time I think I will halve the honey.
There's also no artificial coloring so that's automatically an improvement on lollies and boxed jelly.
I will be interested to see how these handle being in a lunch box and if they will go on cupcakes without reacting with the icing. They'd be a great quick after dinner or movie time treat..so  many ideas to play with!

I can't think of anything bad about these except you may be tempted to eat the whole batch yourself!

May your nest be blessed,
Lisa

This post is also part of Mandarin Orange Monday


Friday, January 18, 2013

A Nifty Thrifty Easter...

Today I was at The Warehouse (for non New Zealand'ers that's a place you can by almost anything) and right next to the clearance price candy canes were EASTER EGGS. Already! Easter is 9 weeks 4 days away and most of us are still thinking about back to school supplies not basket fillers! Well, at least I was until I saw the Easter Eggs. Rather than be tempted to buy them early I decided to plan for Easter like I do Christmas.
My kids are now teens and a tween but they still like to get visits from Easter Bunny (funny that.) Last year they got  home made marshmallow eggs. I was excited to make my own marshmallow ones, a step up from my regular home melt and mold chocolates. To package them I wrapped them in tinfoil and put them in a reusable lunchbox container along with bunny noses, bunny tails and bunny 'bombs'. (Jelly beans in pink, white and black.) To put it simply, I was working with a bigger budget last year and as much as a certain boy loved the bunny bombs (yes..poop!) I won't do them 2 years in a row.

Here's my plan...

Carrot Candy Popper, Easter Crafts
http://dotcomwomen.com/crafts/carrot-candy-popper-easter-crafts/4199/


This home 'grown' carrot filled with home made Easter chocolates and one or two of these...
and a cute (not for my son...it will need to be black or something for him!) facecloth bunny.
I will modify the design a bit but below is the general idea. I want them to be able to use the facecloth afterwards! 

The bunny is going to hide one of these colours of faith jelly bean bracelets (or a bag of them in the corresponding colours.)
--
Now I just need to figure out Easter Brunch...

May your nest be blessed,
Lisa


This blog post is linked to Shabby Creek Cottage  please visit the other bloggers, many great posts to be found!


PS: I just made these...they'd be great molded as something more Easter like and they're all natural!
See them here.


Wednesday, January 16, 2013

Home made chicken nuggets...MMMM!!

These beauties were even more delicious than they look!
 I adapted several recipes and mixed them up to come up with my own mix. I'm gluten and lactose free and I decided these would be too. Oh, I am glad I did! The recipe that follows is simple, frugal and gluten free although you can easily adapt it so it's not gluten free.


WARNING: Your family WILL request these again!

I used...2 cups of gluten free flour (premix, I don't attempt to make my own flour mix)
6 broken taco shells (for the crunch and flavour)
1 egg (it was all I had so I am glad that worked!)
1 kg of diced (imperfectly) chicken breast.

I made my crumb mix using taco shells that had broken (I couldn't throw them out) but you could easily use taco chips or cornflakes. Making them was a simple process of dipping in egg, allowing egg to run off and then rolling them in the crumb. I tried a non crumbly mix but after cooking a few and tasting them 'we' the family decided it need crumb for crunch! 

In yummery: 
I think that these were a frugal choice in comparison to the bought nuggets. It cost me $12 for 1 kg of skinless, boneless chicken breast (see below) $12 is actually a bit more per person than I usually spend on meat for our family  (2 adults, 2 teens, 1 tween.) You can buy a bag of nuggets for the same price BUT for my $12 I got 52 nuggets, no presevatives, no extra fat and I was able to make them gluten free. Divide the 52 nuggets by 5 people and that's plenty, if not too many, each. No-one complained about having extra! Funny that!

Against: 
The chicken was on special, down about $5 per kg so I won't be able to make this on a whim. I will need to find the breast on special first.
Personally, I would have liked a bit more flavour and I will add in spices or herbs next time.

May your nest be blessed,
Lisa


This post is also linked on Pinterest and Thrifty Thursday

Saturday, January 12, 2013

Altered Tin


Altered Tin
This tin was originally a black velvet covered jewellery box with silk lining Not a vintage tin or anything fancy! You probably have one of these at home collecting dust...and boy do they collect dust!

When I took the material off there was a lovely smooth tin just right to glue onto. Lucky me!

Ingredients...
Small book (op shop find)
Key (op shop find)
Small piece cut from crochet doily, button attached to make a flower (op shop find)
Lace doily (you guessed it....op shop find!)
Scrap cloth dyed with coffee
Duck feathers.  
PVA glue.

I was really happy with the sweet tin and the way it nestled on the page with the other elements. (See below)


See the other Sweet Sunday posts here. Tin also posted on Pinterest.

Thursday, January 10, 2013

Guest Heart Thursday...remembering the love.

When I saw the meme for Guest Heart Thursday I immediately thought of the hearts I made for an altered book collaboration. It was so lovely to go back to some of my old posts see them again so I thought I would show a few here for the meme.

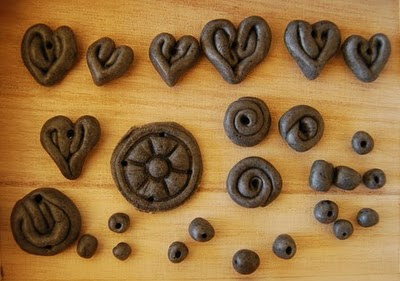
 At the time one of my art goals was to make some of my own beads. There are a few home made paper ones in the photo above but mostly they are salvaged from old necklaces and op shops. I made the ones below from a product similar to fimo. I was making balls but got bored and made hearts...I am glad I did!
 Some of these beads are still sitting unused in my bead box but pictured below is a heart that did get put to good use...
The heart was a perfect handmade, thrifty embellishment to add to the book page. Actually, as it turns out so did a lot of other hearts! Click this link to see them.


May your nest be blessed,
Lisa

Wednesday, January 9, 2013

Ol Mother Hubbard's Cupboard Part 1


We tried out this recipe for banana bread. I made it twice, the first time with 3 bananas (as the recipe required)  and the second time I doubled everything but the amount of bananas. It was devoured so quickly that I decided it would be better to make a bigger loaf next time...but I really should have doubled the banana. The banana's in the recipe make a nice moist bread that was still moist after2 days. It should add that it only lasted this long because I insisted on the kids having no more that 2 slices a day. This was not met with enthusiasm! The second loaf was bigger as I wanted but it was also drier. My bad. If I was after a firmer bread this would be the one.

 In yummery (he he that was too easy) I would say that this is a good recipe for using up ripe bananas or the frozen stash in the freezer.  I count it as frugal because it is low in sugar and butter and uses only one egg. It also uses NO milk.  Also to it's advantage is that is slices well and doesn't crumble so it would be a good lunch box addition.
On the flip side, it takes an hour to bake so it's not something you could make last minute. Problem or not?

May your nest be blessed,
Lisa

This recipe has also been contributed to Thrifty Thursday and pinned on pinterest Visit Thrifty Thursday to see the' linky thing' for other entries.
.


Tuesday, January 8, 2013

Page Keepers- Rustic Nests.


 I made these rustic nests page keepers from recycled fabric,wide elastic and beads. Most of my beads were orginally part of  necklaces that I've found at second hand shops.The elastic wraps around the book acting as both a book mark and pocket to hold notes and other papers.  How handy is that?


 I made the nest from a old crocheted doily. To make you own nest simply cut a circular piece from the doily and then long stitch around it to gather it loosely. I started at the top and worked my way down. As you sew you can stitch bits of fluffy scraps to fill your nest. It all depends on the look you want.

Once my nest was finished I added beads.  Be careful to always sew through to and from the bottom of your nest so the sides don't give your stitching away!

When you nest is complete gather up a small 'posey' of scraps and sew together in a way that you like. Try to stitch them together where you will place your nest...it will hide the stitching. You can add anything to your posy- lace, ribbon, chain, mesh etc.You can also sew little beads or buttons on the fabric. If your posy is too floppy for your liking adding a bead or button like in the photo below will help weight it. 


Take a second scrap of doily, lacy material or similar and attach your completed nest/posy embellishment to the elastic band. The doilly should be longer and slightly wider than your posy.  My elastic was found in a second hand store (thrift, op shop.) Hopefully you have been lucky enough find some there too! How much you need depends on the size of your book. Generally you cut it the length of your book doubled plus an extra quater to allow it room to stretch. L x2 + 1/4 = right length!
 As you can see there aren't any rules to what you put on the page keeper. You may like to ditch the nest all together and add a big, fancy heart, scrabble tiles or what ever else takes your fancy!


Not only do I think these nest page keepers are delightful I can also vouch for the fact that they are easily made from scraps, in front of the tv and on a budget. 

If you make one I would love you to share it with me. Have fun and may you nest be blessed!


Ol Mother Hubbard...


Old Mother Hubbard
Went to the cupboard
To get her poor doggie a bone,
When she got there
The cupboard was bare
So her poor doggie had none  she went and made her own!

This is my first post on Ol' Mother Hubbard. My home is my nest and a strong nest raises strong birds. After a rough few years fighting depression, loosing our financial security, bad health and generally getting knocked about I am kicking the dust of my shoes and moving on. I am thankful for my blessings, my family and my nest. This blog will document my journey as I learn how to get more bang for our buck, to simplify my life and to live a moment of each day.

Strangers are only friends we haven't met yet so why not come on in, introduce yourself and enjoy a slice of NZ living with me?


May your nest be blessed!
Lisa