Showing posts with label Thrifty. Show all posts

Monday, April 15, 2013

It's Autumn,It's Wet, It's time for Soup!

Carrot Soups

What's not to love about carrot soup? 
It's a great choice nutritionally
It's frugal
It's quick
It's satisfying
It's easy to make
It's versatile
AND
It tastes GREAT!

Thanks to my own version of carrot soup  I had 6 vegetables for lunch and there's enough left over for at least 3 more servings. I don't know about you but I don't usually eat 6 different vegetables at lunch time!

Here's my version: 5 carrots, 1 red capsicum, 1/4 cauliflower, 1large shucked corn cob,  1 medium potato and 1 medium red kumara, cooked, blended with stock and water..seasoned to taste.

I cruised pinterest for a while before deciding to adapt a recipe to better suit what ingredients I have but above it a collage of some other tempting carrot soups....

Photo 1
Simple Carrot Soup, one small change and it will be vegan friendly too.
Photo 2
Cream of Carrot Soup, not as fat free as the others but all things in moderation I say!
Photo 3
German Carrot Soup I can't wait to try this one. It doesn't use stock so  a good one for a last minute soup!
Photo 4
Roasted Carrot Soup contains ginger for added oomph! 
Photo 5
Carrot and Kumara (sweet potato) Soup This site also contains a variation of this recipe using maple syrup and cinnamon...
Photo 6
Carrot and Cauliflower soup. Recipe uses a whole head of cauliflower and not a drop of cheese sauce in sight!


So, who's hungry?

May your nest be blessed!

Post also linked to: Hello Monday


Friday, January 25, 2013

Off the Page


I teach 2 of my 3 kids (both teens who don't fit the system!) at home. When they were younger I worked off my own curriculumn but now they are older and one's doing exams we study via the NZ Correspondence School (Te Kura.) There's still a lot of extra teaching to be done in and around the subject wok they send and I like to do what we call 'off the page' work. Usually we focus on the holidays (St Patricks, Mardi Gra's etc) but this term I'm introdcing this box...

The envelopes are all made from magazine pages as you can see but contain half hour activties covering everything from survival skills in a disaster to scripture and butchers diagrams of meat cuts.

The idea is that they will pick an envelope to carry on with if I am busy (usually with the other sibling) so they're not just sitting and waiting. It will also encourage independant working on topics not in the NZ curriculmn. That's one of the things I love about home teaching and tt's cost nothing other than time and printer ink. That's a win/win in my book!

May you nest be blessed,
Lisa

Feel free to drop in on the other participants and enjoy their thrifty sharing too.


Friday, January 18, 2013

A Nifty Thrifty Easter...

Today I was at The Warehouse (for non New Zealand'ers that's a place you can by almost anything) and right next to the clearance price candy canes were EASTER EGGS. Already! Easter is 9 weeks 4 days away and most of us are still thinking about back to school supplies not basket fillers! Well, at least I was until I saw the Easter Eggs. Rather than be tempted to buy them early I decided to plan for Easter like I do Christmas.
My kids are now teens and a tween but they still like to get visits from Easter Bunny (funny that.) Last year they got  home made marshmallow eggs. I was excited to make my own marshmallow ones, a step up from my regular home melt and mold chocolates. To package them I wrapped them in tinfoil and put them in a reusable lunchbox container along with bunny noses, bunny tails and bunny 'bombs'. (Jelly beans in pink, white and black.) To put it simply, I was working with a bigger budget last year and as much as a certain boy loved the bunny bombs (yes..poop!) I won't do them 2 years in a row.

Here's my plan...

Carrot Candy Popper, Easter Crafts
http://dotcomwomen.com/crafts/carrot-candy-popper-easter-crafts/4199/


This home 'grown' carrot filled with home made Easter chocolates and one or two of these...
and a cute (not for my son...it will need to be black or something for him!) facecloth bunny.
I will modify the design a bit but below is the general idea. I want them to be able to use the facecloth afterwards! 

The bunny is going to hide one of these colours of faith jelly bean bracelets (or a bag of them in the corresponding colours.)
--
Now I just need to figure out Easter Brunch...

May your nest be blessed,
Lisa


This blog post is linked to Shabby Creek Cottage  please visit the other bloggers, many great posts to be found!


PS: I just made these...they'd be great molded as something more Easter like and they're all natural!
See them here.


Thursday, January 10, 2013

Guest Heart Thursday...remembering the love.

When I saw the meme for Guest Heart Thursday I immediately thought of the hearts I made for an altered book collaboration. It was so lovely to go back to some of my old posts see them again so I thought I would show a few here for the meme.

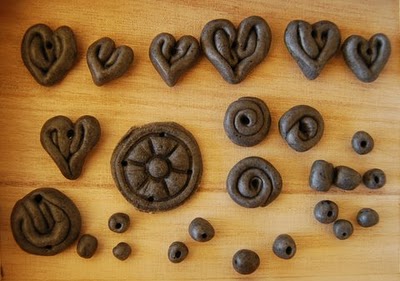
 At the time one of my art goals was to make some of my own beads. There are a few home made paper ones in the photo above but mostly they are salvaged from old necklaces and op shops. I made the ones below from a product similar to fimo. I was making balls but got bored and made hearts...I am glad I did!
 Some of these beads are still sitting unused in my bead box but pictured below is a heart that did get put to good use...
The heart was a perfect handmade, thrifty embellishment to add to the book page. Actually, as it turns out so did a lot of other hearts! Click this link to see them.


May your nest be blessed,
Lisa

Wednesday, January 9, 2013

Ol Mother Hubbard's Cupboard Part 1


We tried out this recipe for banana bread. I made it twice, the first time with 3 bananas (as the recipe required)  and the second time I doubled everything but the amount of bananas. It was devoured so quickly that I decided it would be better to make a bigger loaf next time...but I really should have doubled the banana. The banana's in the recipe make a nice moist bread that was still moist after2 days. It should add that it only lasted this long because I insisted on the kids having no more that 2 slices a day. This was not met with enthusiasm! The second loaf was bigger as I wanted but it was also drier. My bad. If I was after a firmer bread this would be the one.

 In yummery (he he that was too easy) I would say that this is a good recipe for using up ripe bananas or the frozen stash in the freezer.  I count it as frugal because it is low in sugar and butter and uses only one egg. It also uses NO milk.  Also to it's advantage is that is slices well and doesn't crumble so it would be a good lunch box addition.
On the flip side, it takes an hour to bake so it's not something you could make last minute. Problem or not?

May your nest be blessed,
Lisa

This recipe has also been contributed to Thrifty Thursday and pinned on pinterest Visit Thrifty Thursday to see the' linky thing' for other entries.
.


Tuesday, January 8, 2013

Page Keepers- Rustic Nests.


 I made these rustic nests page keepers from recycled fabric,wide elastic and beads. Most of my beads were orginally part of  necklaces that I've found at second hand shops.The elastic wraps around the book acting as both a book mark and pocket to hold notes and other papers.  How handy is that?


 I made the nest from a old crocheted doily. To make you own nest simply cut a circular piece from the doily and then long stitch around it to gather it loosely. I started at the top and worked my way down. As you sew you can stitch bits of fluffy scraps to fill your nest. It all depends on the look you want.

Once my nest was finished I added beads.  Be careful to always sew through to and from the bottom of your nest so the sides don't give your stitching away!

When you nest is complete gather up a small 'posey' of scraps and sew together in a way that you like. Try to stitch them together where you will place your nest...it will hide the stitching. You can add anything to your posy- lace, ribbon, chain, mesh etc.You can also sew little beads or buttons on the fabric. If your posy is too floppy for your liking adding a bead or button like in the photo below will help weight it. 


Take a second scrap of doily, lacy material or similar and attach your completed nest/posy embellishment to the elastic band. The doilly should be longer and slightly wider than your posy.  My elastic was found in a second hand store (thrift, op shop.) Hopefully you have been lucky enough find some there too! How much you need depends on the size of your book. Generally you cut it the length of your book doubled plus an extra quater to allow it room to stretch. L x2 + 1/4 = right length!
 As you can see there aren't any rules to what you put on the page keeper. You may like to ditch the nest all together and add a big, fancy heart, scrabble tiles or what ever else takes your fancy!


Not only do I think these nest page keepers are delightful I can also vouch for the fact that they are easily made from scraps, in front of the tv and on a budget. 

If you make one I would love you to share it with me. Have fun and may you nest be blessed!