Showing posts with label Pinterest. Show all posts

Tuesday, October 22, 2013

7 Deadly Sins.

For the 2nd year in a row one of my children has asked to do Halloween. We've never done Halloween.
Last year we went to a light party run by a local group as an alternative to the dark but this year the kids are too old. (I have 2 teens and a nearly teen.) I played with other 'een' ideas. Marshmellow-een, Yellow-een, Green-o-een etc. I also considered an Irish Halloween so we could focus on traditions and heritage. Nothing quite fit so I kept thinking and eventually came up with THE SEVEN DEADLY SINS as a theme for a Halloween countdown and FRUITS OF THE SPIRIT as the theme for our NOT Halloween Party on the 31st. I hope the kids will be as excited as I am about this!


Come along and countdown with us....if you dare!

I made tags...
 Decorated...
 (This was a surprise in the morning!)
And left them a dare....

Each sin will have relevant discussions and activities so they will get the treats and I get to feel like we did Halloween without compromising my own values.
Today's sin is GREED. I printed out the parable of the greedy spider (how the spider got a skinny waist) and emailed this link on the Detroit bankruptcy problems to my eldest. Finally, I wrote out the recipe for the Spider Drink I remember from my own child hood.If I had bought plastic spiders yesterday instead of a giant bat I would have made the cool spider ice cubes below too.
Freeze plastic spiders for drinks 
There's always next year!

I don't plan on doing a formal lesson on Greed. I am hoping the kids will think on this themselves and take away the related ideas from each activity, they're old enough to know about greed.

Watch this space for the rest of the countdown!

Saturday, October 5, 2013

To the market we shall go...

 I've recently started going to the local market to try my luck at selling home sewn goodies.
I made the icy-pop (ice lolly) cuffs last night from recycled polar fleece and fabric scrap. These were super easy and quick. I made my own pattern but got the inspiration from here.

 Flags, flags, flags! I love flags. The larger ones are beach flags or party/parade flags. The smaller ones are sandcastle flags. Every sandcastle needs a flag right?

My daughter made these fish rattles from recycled fabrics.
 If you've seen my last post (sail away with me) you will remember these boats. I finally got the photos to load for me so that I would share here. I'm getting lots of positive feedback on these but so far only 1 sale of each. Fingers crossed for better luck next time!
Where are all the punters?? Such a nice day but a poor turn out :( 
The organiser is struggling a bit, but willing to take on suggestions so hopefully this will be a great spring/summer market season yet!

Wednesday, July 3, 2013

Building with boxes part 2. Math Revision.


 Our cardboard community was so much fun to make...and a whole lotta math revision to boot!
It's easy to make your own box community and the addition of lights makes it the results that much more amazing. It helps that my son has an obsession with them:)

 This community could easily be a single house or themed to your own preference.
I can imagine it snow covered for winter, haunted for Halloween..pink for a princess...


 Come on in...there's a party inside!

May your nest be blessed,
Lisa

Linked to: Wow us Wednesdays

Thursday, April 18, 2013

Nail Box, Planter Box

Feeling inspired by vertical gardens and other such things I've seen in Pinterest lately I decided to revamp a nail box I had. It's been sitting on my porch holding a nest and nothing else for ever. What a shame! Succulents and a wild fern were plucked from else where on our section and the bird came from else where in my house.


 .


 The two little potted plants were my only purchase. Everything else I already had.
 

 I love the writing on the box, graffiti like next to the natural features.
Actually, I love this whole box!

I hope if you are feeling inspired to make a little something for the garden or porch I hope you will indulge yourself. I am so happy with this planter box and it was the easiest DIY project yet!

Saturday, March 16, 2013

Ice-cream Party!!

 Even an ice-cream party can have healthy ice-cream themed treats. Popcorn cones using home popped and flavored corn and packed into a cone were a hit with the kids. I was rapt with how much like ice-cream these looked!

 Ice-creams made from gluten free marshmallows, melted chocolate and sprinkles. Sweet treat without a huge amount of sugar:)

The cake had to be ice-cream themed too of course! It moved during travel before I took the photo but you can see where I was going with this! The cones needed to be cut slightly to fit the first cupcake in and the icing disguised the gap between the top of the cone and the cupcake. Other than that this was an easy cake and for once we weren't up past midnight wrestling with icing and tricky designs!

Happy ST PATRICK'S DAY everyone and as always,
May your nest be blessed!

Wednesday, January 16, 2013

Home made chicken nuggets...MMMM!!

These beauties were even more delicious than they look!
 I adapted several recipes and mixed them up to come up with my own mix. I'm gluten and lactose free and I decided these would be too. Oh, I am glad I did! The recipe that follows is simple, frugal and gluten free although you can easily adapt it so it's not gluten free.


WARNING: Your family WILL request these again!

I used...2 cups of gluten free flour (premix, I don't attempt to make my own flour mix)
6 broken taco shells (for the crunch and flavour)
1 egg (it was all I had so I am glad that worked!)
1 kg of diced (imperfectly) chicken breast.

I made my crumb mix using taco shells that had broken (I couldn't throw them out) but you could easily use taco chips or cornflakes. Making them was a simple process of dipping in egg, allowing egg to run off and then rolling them in the crumb. I tried a non crumbly mix but after cooking a few and tasting them 'we' the family decided it need crumb for crunch! 

In yummery: 
I think that these were a frugal choice in comparison to the bought nuggets. It cost me $12 for 1 kg of skinless, boneless chicken breast (see below) $12 is actually a bit more per person than I usually spend on meat for our family  (2 adults, 2 teens, 1 tween.) You can buy a bag of nuggets for the same price BUT for my $12 I got 52 nuggets, no presevatives, no extra fat and I was able to make them gluten free. Divide the 52 nuggets by 5 people and that's plenty, if not too many, each. No-one complained about having extra! Funny that!

Against: 
The chicken was on special, down about $5 per kg so I won't be able to make this on a whim. I will need to find the breast on special first.
Personally, I would have liked a bit more flavour and I will add in spices or herbs next time.

May your nest be blessed,
Lisa


This post is also linked on Pinterest and Thrifty Thursday

Saturday, January 12, 2013

Altered Tin


Altered Tin
This tin was originally a black velvet covered jewellery box with silk lining Not a vintage tin or anything fancy! You probably have one of these at home collecting dust...and boy do they collect dust!

When I took the material off there was a lovely smooth tin just right to glue onto. Lucky me!

Ingredients...
Small book (op shop find)
Key (op shop find)
Small piece cut from crochet doily, button attached to make a flower (op shop find)
Lace doily (you guessed it....op shop find!)
Scrap cloth dyed with coffee
Duck feathers.  
PVA glue.

I was really happy with the sweet tin and the way it nestled on the page with the other elements. (See below)


See the other Sweet Sunday posts here. Tin also posted on Pinterest.

Thursday, January 10, 2013

Guest Heart Thursday...remembering the love.

When I saw the meme for Guest Heart Thursday I immediately thought of the hearts I made for an altered book collaboration. It was so lovely to go back to some of my old posts see them again so I thought I would show a few here for the meme.

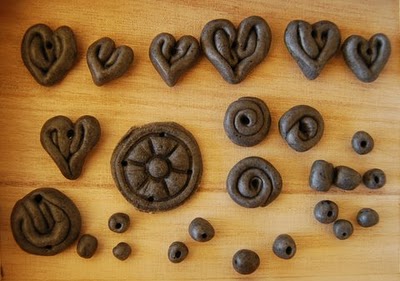
 At the time one of my art goals was to make some of my own beads. There are a few home made paper ones in the photo above but mostly they are salvaged from old necklaces and op shops. I made the ones below from a product similar to fimo. I was making balls but got bored and made hearts...I am glad I did!
 Some of these beads are still sitting unused in my bead box but pictured below is a heart that did get put to good use...
The heart was a perfect handmade, thrifty embellishment to add to the book page. Actually, as it turns out so did a lot of other hearts! Click this link to see them.


May your nest be blessed,
Lisa

Wednesday, January 9, 2013

Ol Mother Hubbard's Cupboard Part 1


We tried out this recipe for banana bread. I made it twice, the first time with 3 bananas (as the recipe required)  and the second time I doubled everything but the amount of bananas. It was devoured so quickly that I decided it would be better to make a bigger loaf next time...but I really should have doubled the banana. The banana's in the recipe make a nice moist bread that was still moist after2 days. It should add that it only lasted this long because I insisted on the kids having no more that 2 slices a day. This was not met with enthusiasm! The second loaf was bigger as I wanted but it was also drier. My bad. If I was after a firmer bread this would be the one.

 In yummery (he he that was too easy) I would say that this is a good recipe for using up ripe bananas or the frozen stash in the freezer.  I count it as frugal because it is low in sugar and butter and uses only one egg. It also uses NO milk.  Also to it's advantage is that is slices well and doesn't crumble so it would be a good lunch box addition.
On the flip side, it takes an hour to bake so it's not something you could make last minute. Problem or not?

May your nest be blessed,
Lisa

This recipe has also been contributed to Thrifty Thursday and pinned on pinterest Visit Thrifty Thursday to see the' linky thing' for other entries.
.


Tuesday, January 8, 2013

Page Keepers- Rustic Nests.


 I made these rustic nests page keepers from recycled fabric,wide elastic and beads. Most of my beads were orginally part of  necklaces that I've found at second hand shops.The elastic wraps around the book acting as both a book mark and pocket to hold notes and other papers.  How handy is that?


 I made the nest from a old crocheted doily. To make you own nest simply cut a circular piece from the doily and then long stitch around it to gather it loosely. I started at the top and worked my way down. As you sew you can stitch bits of fluffy scraps to fill your nest. It all depends on the look you want.

Once my nest was finished I added beads.  Be careful to always sew through to and from the bottom of your nest so the sides don't give your stitching away!

When you nest is complete gather up a small 'posey' of scraps and sew together in a way that you like. Try to stitch them together where you will place your nest...it will hide the stitching. You can add anything to your posy- lace, ribbon, chain, mesh etc.You can also sew little beads or buttons on the fabric. If your posy is too floppy for your liking adding a bead or button like in the photo below will help weight it. 


Take a second scrap of doily, lacy material or similar and attach your completed nest/posy embellishment to the elastic band. The doilly should be longer and slightly wider than your posy.  My elastic was found in a second hand store (thrift, op shop.) Hopefully you have been lucky enough find some there too! How much you need depends on the size of your book. Generally you cut it the length of your book doubled plus an extra quater to allow it room to stretch. L x2 + 1/4 = right length!
 As you can see there aren't any rules to what you put on the page keeper. You may like to ditch the nest all together and add a big, fancy heart, scrabble tiles or what ever else takes your fancy!


Not only do I think these nest page keepers are delightful I can also vouch for the fact that they are easily made from scraps, in front of the tv and on a budget. 

If you make one I would love you to share it with me. Have fun and may you nest be blessed!