Thursday, March 28, 2013

Cupcakes, Chemical Change and Pepsin Enzymes!

Yes it is Easter, Easter and more Easter at our house...but most of all...HAPPY Easter to you all!
I hope you have a hot cross bun on the ready with a nice cuppa as you visit today:)

 Above: Our table display, it's not much but I like it's simplicity.
Below: Easter Cupcakes!
 To make these yourself mix and bake your preferred cupcake mix. When cool drizzle over melted white chocolate and place on top a Easter themed chocolate. I made the chocolates using choc molds. One thing I like about these is that by changing the colours and chocolates you can make these for adults of children without any extra expense or hassle.One batch two purposes!
 You can see more of this Easter embellishment I made using recycled and scrap materials on my other blog if it takes your fancy!
 When you teach at home you quickly learn to utilize all opportunities! I wanted a Easter decoration for the window and my son needed to review chemical change...add the two together and you have a burning/chemical change/products Easter egg!

 Did you know carbon glows yellow when it is heated? The yellow part of a flame contains carbon, carbon dioxide and water. Grey in the flame is unburnt vapors and blue is complete burning with carbon dioxide and water present.

 We produced black carbon (soot) by putting tin foil in the yellow part of the flame. 
A change that produces new substances is called CHEMICAL CHANGE. The substance produced by chemical change is called a PRODUCT. In our case Carbon which we used to make these adorable and funny bunnies. Yes my son did put a bunnie in a pot and shoot one out of a canon....BOYS!
 My daughter is studying the digestive system as part of her NCEA science course. Not to be left out she created a Easter Egg showing the break PEPSIN ENZYME breaking down PROTEIN MOLECULES.


 Eventually the protein is broken down so small it can pass into the blood stream (as AMINO ACIDS)
 Pepsin bunnies...check out Little Miss Cute Bunnie and Big Pepsin.

 Smaller protein molecules...unfortunately I forgot to photograph the even smaller bunnies in orange!
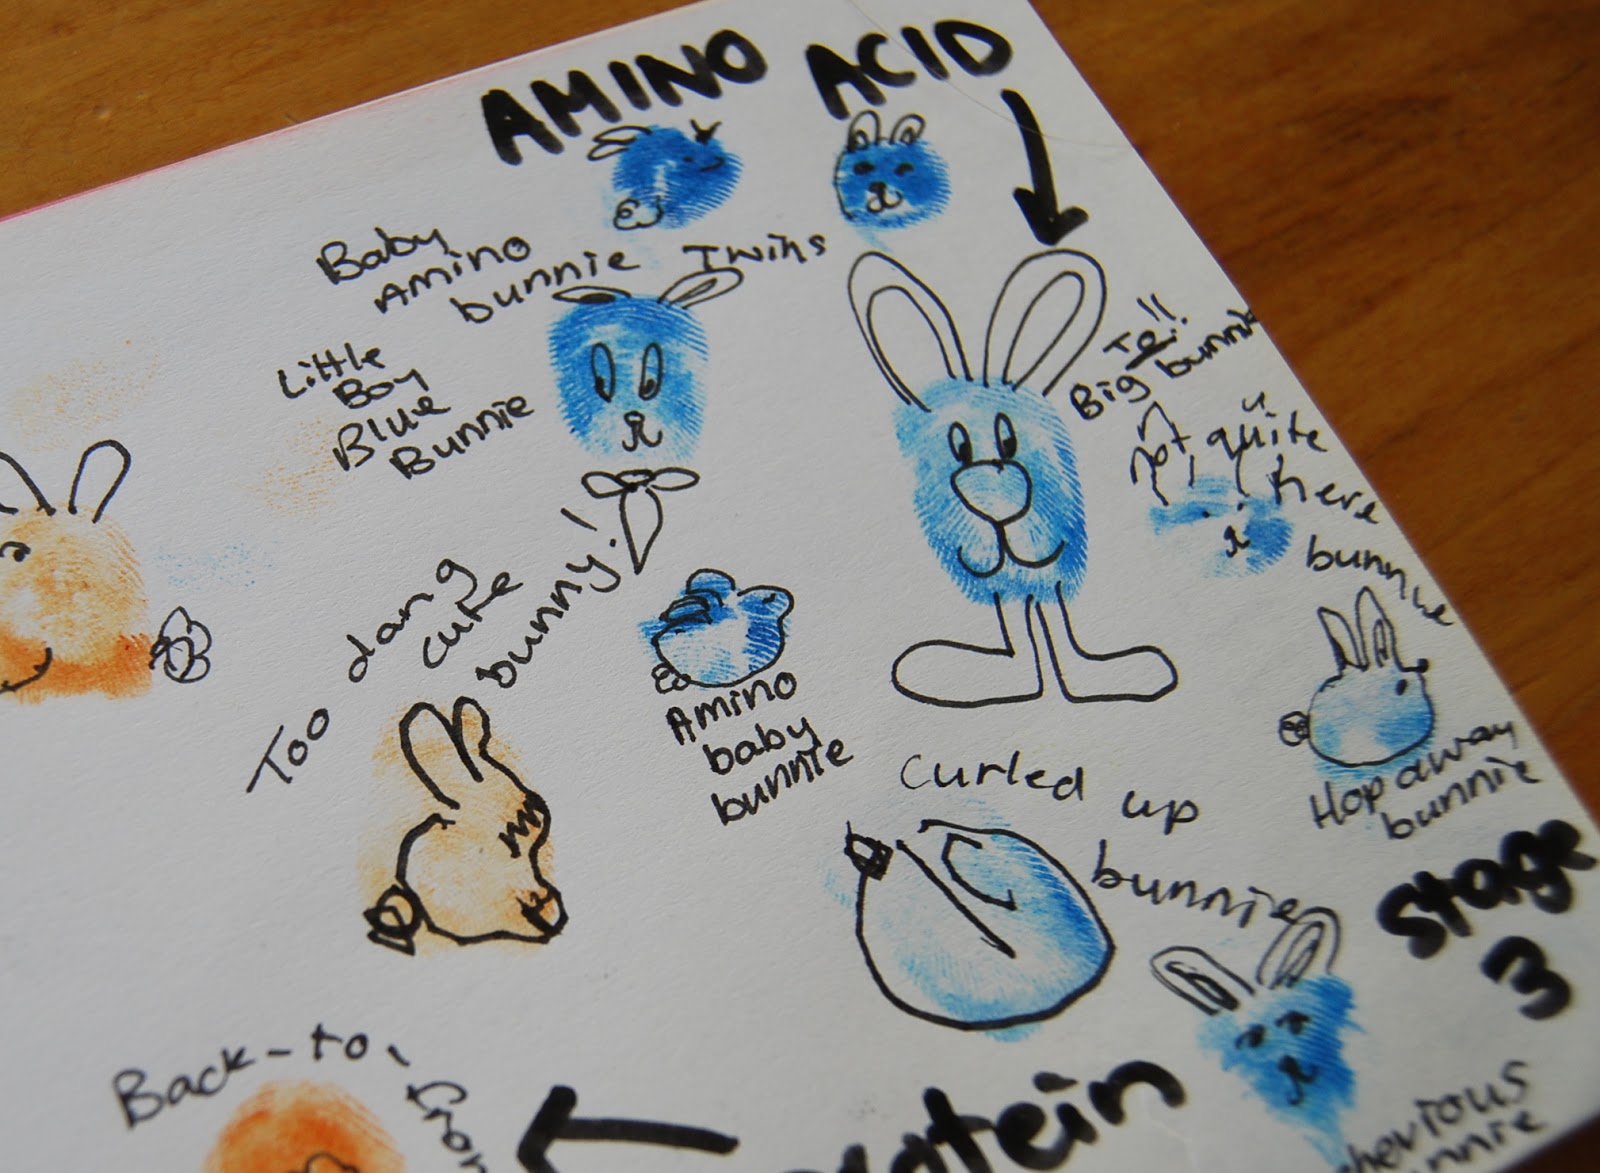
 Baby blue Amino Acid Bunnies, next to Too Dang Cute Bunnie from the protein stage...
Can you tell we had fun??

May your nest be blessed!
Lisa

Also linked to:
Share the Joy 

Monday, March 25, 2013

Science Fun 5.Digestive System.

 My daughters gummy snake digestive system. 
We put tracing paper (lunch wrap) over top of a poster and used it as a guide.
Then using the poster and book as a guide she typed labels for each part of the digestive system.


It's pretty cool when after the lesson you get to digest it too!


May your nest be blessed,
Lisa

Tuesday, March 19, 2013

Science Fun 4: Transpiration and Photosynthesis

 Today we learned about stomata and photosynthesis. The book we are studying looks at how plants live, what processes must take place and why. Transpiration (involving stomata) and photosynthesis are just two of these processes.
 After the book work I decided we should follow up with some fun, hands-on work to really cement what we had learned so this is what we made.
Above: Drawing on the icing lines, turns out he's pretty good with an icing bag!  Conveniently our biscuits also had holes which represented stomata.

The process of transpiration is similar to human's sweating, it is the release of a substance through pores. In the case of plants the pores are called 'stomata' and they are located on the under side of the leaf. Also, the leaves aren't sweating they are breathing.
Carbon Dioxide IN
Oxygen OUT
(The opposite of the exchange that takes place when we breathe.)

This diagram shows both the process of transpiration and photosynthesis.
Photosynthesis is the production of energy (carbohydrates.)
Not all plants do this with the entire leaf but in out diagram it does. We used the image below to make ours.


What a great way to learn! Not only will it be remembered it was thrifty, fun and made me feel like it was the start of spring here and not the start of autumn.


As always, may your nest be blessed.
Lisa


This post is also linked to the French Country Cottage SPRING PARTY. See other entries here.

Saturday, March 16, 2013

Ice-cream Party!!

 Even an ice-cream party can have healthy ice-cream themed treats. Popcorn cones using home popped and flavored corn and packed into a cone were a hit with the kids. I was rapt with how much like ice-cream these looked!

 Ice-creams made from gluten free marshmallows, melted chocolate and sprinkles. Sweet treat without a huge amount of sugar:)

The cake had to be ice-cream themed too of course! It moved during travel before I took the photo but you can see where I was going with this! The cones needed to be cut slightly to fit the first cupcake in and the icing disguised the gap between the top of the cone and the cupcake. Other than that this was an easy cake and for once we weren't up past midnight wrestling with icing and tricky designs!

Happy ST PATRICK'S DAY everyone and as always,
May your nest be blessed!

Sunday, March 10, 2013

Science Fun- Specialised Cells. The Goblet Cell.

The goblet cell is a specialized cell. It's purpose is to discharge mucus- aka SNOT and PHLEGM. Exciting stuff for a 13 year old boy and I had no trouble at all getting him actively involved!There are of course many specialized cells in the human body. I chose this one because it was boy friendly!

 Marshmallows represent the Goblet Cell. He used the small pink lollies to represent cilia as well as cells within the gel mucus. That was his idea and I am happy to improvise where needed!  The coloured lolly-sticks are pieces of mucus being discharged but shown in the varying colours mucus (yes the snot!) can come in.
 Icing made not only a good glue but a wonderful cell mucus. It is different to the mucus discharged by the goblet cell, it's more of a lubricant to keep everything working well.Again, my son's input!

 Next to the Goblet cells my son made a scale to show the different types of mucus which may end up on your tissue and what they mean in regards to your health.


Next science post is SNOT ROCKETS aka the SNEEZE. Check back soon if you want to see the results of our activities.

May your nest be blessed!
Lisa

Thursday, March 7, 2013

Science Fun- Alveloi, Bronchial Group and Gas Exchange

 We are having an amazing, productive week. I love it when things roll this way!
Above: The makings of a fabulous physiology session focusing on the respiratory system.

Below: Reconstruction of the bronchial group and alveloi. They are located inside the lung organ. 

You can click on any image to enlarge them.


 The large pink reconstruction shows large alevolar sac. Ironically the small pink lollies are called 'smokers.' I remember these from when I was a kid, they taste like aniseed but I am not sure how they got there name.
 The above photo shows airway tubes being affected by asthma and as it should look.
The photo below shows gas exchange taking place.


My son reconstructed the Goblet Cell, a specialised cell that discharges mucus, please check back soon to see the lesson :)

May your nest be blessed,
Lisa


Post shared on Pinterest and Share the Joy Thursday.

Sunday, March 3, 2013

Science Fun- Cycles and Cells

 What a great lesson this turned out to be! My son was sent a science book on Cycles and Cells from the correspondence school he's enrolled in. My first thought was...oh no! He's never going to want to do this. So I put my thinking cap on and got to work. He may not be interested in cycles and cells as such but he is interested in strawberry plants. It's now I should mention that my son has aspergers, he has strong interests that he obsesses over and currently it's his strawberry plants. That was my ticket in and I am rapt with how much we both learned today!
Today thanks to this website  and my son's planter boxes we were able to work through the strawberry plants life cycle and thanks to the school work book we were able to learn about producers, animals and decomposers, natural balance, carbon dioxide and oxygen. I love school days like this!


 The healthy strawberry plants my son is growing from runners our neighbor gave us and some crowns rescued from my gardening attempts. This is a healthy community but it isn't yet a natural community. In a natural community balance is achieved naturally- it needs no additional 'help' from us. These plants have been faithfully fed with liquid fertilizers.
A runner plant. Runners are sometimes referred as daughter plants but their correct name are 'stolons.' The runner plant is a direct clone of the Mother and are a result of asexual reproduction. (Another life cycle we discussed today.) Strawberry plants grown from seeds and genetically varied from their parents (this information resulted in a brief discussion in the genetic links between my kids and me..and the clone information led to a conversation about human twins/identical twins and egg splitting at conception...I love it when this happens.)


In the crown (the hard knobby cluster at the base of the plant) a lot of activity takes place. This is where leaf formation takes place...or the production of photosynthesizing tri-lobed leaflets which eventually sit upon non-woody stems...if you want to be really fancy about it!


 Flower buds form in the crown  during late summer and autumn but remain dormant and hidden over winter, eventually the plant sends them out to fruit (and play it's part in non asexual reproduction.)
 A variety of causes can result in the death of a plant's leaf or even the whole plant. The most likely cause in a well watered and protected environment is an attack by fungi (the de-composer's of the natural cycle) which break down the plants structures, resulting in raw materials being returned to the environment and the life cycle and other entwined cycles to be continued.
Unless they have the misfortune of being in my garden patch and not my sons! Obviously there's some genetic variation between my son and I which has resulted in one of us having a green thumb and the other having the opposite!

Next we are looking at plant cells more closely and after that human cells so watch this space!

May your next be blessed,
Lisa


Sunday, February 17, 2013

Frugal Banana Fritters


There has been an unexpected bonus to having to learn to adapt to my new grocery budget...the rediscovery of long lost recipes from my own childhood. One of these is fritters.


Lately I have rediscovered vegetable fritters, corn fitters and now banana fritters. Just the idea of a simple, warm, soft fritter automatically evokes a feeling of comfort in me. There's only one fritter from my childhood that I am not keen to revisit and that's lambs brain fritters. Ewww. I am just not that hungry yet! Haha.

Today's banana fritters were born from the necessity to whip up something healthy, filling and loved by all 3 kids without eggs, sugar or anything fancy like condensed milk. I also didn't want to be turning the oven on for one thing. Thanks goodness for Pinterest!

I made little bite sized ones because I was aiming for a nibble sized fritter. I also envisioned them sprinkled with cinnamon and sugar too but the 'test run' had the kids saying they were better without..I never saw that coming!

Here's the recipe for the fritters, I adapted it from a few I found on line.


4 medium mashed bananas
10 TBLSP Flour ( I used white but it could easily be gluten free or another alternative)
3 TBLSP cold water
1 tsp baking soda

Combine wet then dry until you have a pikelet like batter.
Drop a tablespoon size dollop of batter into hot oil and shallow fry until lightly browned.

I used canola oil but I think they would have been crisper if fried them in butter, will try that next time!

May your nest be blessed,
Lisa


The Mistake Cake


Turning a whoopsie into a whoopee!

Occasionally it happens to all of us I am sure, the cake the just doesn't cook the way you want it too. Thankfully all things can be made good with custard and jam :)

I made this as if it was a bread and butter pudding but instead of egg I added custard powder (my kids find it too eggy and don't like b & b pudding.)  I finely cubed and crumbled my cake (actually it was supposed to be a cinnamon loaf)  into a casserole dish then baked it in my milk mixture with a little sugar added. The sugar wouldn't be needed if your cake was sweet though. My original loaf was more bread like than cake. Once it had cooked (set) I spread the last of a jar of jam (about 3 tbsp) over the hot pudding and left it to melt /glaze while we ate dinner.

Although served as pudding tonight the left overs will make a welcome, filling breakfast in the morning. Much better than plain ol' toast and jam!

No-one need ever know it was a mistake cake (or how close to bread and butter pudding this actually is!) Full tummys, happy kids, happy me!

May your nest be blessed,
Lisa


Friday, February 15, 2013

Homemade Donut/Doughnut

I have been fascinated with bread making lately having only just got the hang of it. No doubt my family will be pleased as I've turned out several heavy, scone like loaves and buns in my efforts to make bread!
Yesterday I turned another new page and made baked donuts. The round kind with a hole in the middle.
You can of course cook both the ring and the piece punched out when making the hole.
The 'holes' were dipped in melted butter and then in a little sugar and cinnamon  an instant hit! I froze a few of the rings to test how they would freeze/defrost so watch this space:)
Several things surprised me about donut making.
  1. They're cheap to make as you control the topping. No one said you must dunk in melted chocolate and serve with cream. That would be divine though!
  2. They're healthy...ish. Only 1/3 c sugar in the actual batter and when baked very little fat. Again, no one said a donut is only a donut when served with chocolate and cream!
  3. No special equipment required. I made mine using a baking tray (not a donut tin) and as I chose a dough I could roll I was able to cut out my circles using a round container and medicine cup.
I know this post would be more interesting with a mouth watering photo but I baked in the evening and the light was not the best for photos...except for the few that I froze there a none of the batch left!
I can however link you to the recipe and the authors scrummy photos!

Happy thrifty Thursday and sweet Saturday everyone!

May your nest be blessed
Lisa

Thursday, February 7, 2013

Bear Grylls and Pythagoras Theorem

Pythagoras is famous for proving that once you know the two sides of a right angle triangle you can work out the length of the 3rd side.
Pythagoras used fancy words like hypotenuse and mentioned squared numbers and roots a lot.
Pythagoras was indeed a very clever mathematician.

What does this all have to do with Bear Grylls and how does the theorem have any relevance to real life?

Below is a short example of how I taught my 13 year old son today. We were focusing on squared numbers (a number x by itself) and on squared roots (the number that can be multiplied by itself.)
For example 5 squared is 5x5 5x5=25 and the squared root of 25 is 5.

Scenario: You are Bear and you are in a hurry to escape the dangerous forest floor. The only suitable tree around is covered in slippery, wet moss and has no low limbs.
You need to climb this tree but don't want to risk scaling it and slipping. Thankfully you have your vine rope and a fallen tree nearby. 

The ground near the tree is covered in tree roots and is very uneven. You will need to stand 30m away from it's base. The lowest branch is 50m up the tree. You measure your fallen tree and find it is 59m long. But is is enough?
 To find out....
Square the distance from you to the tree (30m) 30sqd = 900
Square the distance from the base of the tree to the lowest branch (50m) 50sqd is 2500.
Add the 2 numbers together. 2500 +900 = 3400.
Find the square root 3400. Sq r of 3400 = 58.3
Your fallen tree is 59m, the length you need it to be is at least 58.3m so your trunk is long enough!

Pythagoras said the  2 known sides added together (3400) will be the same as the longest side squared (58.3 x 58.3) 58.3sqd  = 3398.  3398 rounded to the nearest whole number is 3400!

Personally, I am not keen on math and it's definitely not my strong point. What I do have is a strong interest in teaching my children and a strong belief that anything can be taught in a relevant and interesting way. When looking online for real life application of squared roots I found an example similar to mine but using a cat stuck up a flag pole. My son has aspergers and wasn't to fussed about the cat, making the cat/flag pole situation a bad example! Bear Grylls though is a hero and that's a different thing all together!

Total cost of this lesson: Nothing! Now that's thrifty :)

May your nest be blessed,
Lisa


Monday, January 28, 2013

Easy Peasy Fudge

I've never had a lot of success with fudge. It always crystallizes or doesn't set. Also, I never have condensed milk in my cupboard so it's not the sort of thing I can try out again impromptu. Going out to buy a can of condense milk knowing I am likely to waste it makes me feel uneasy to say the least!  I've been thinking a lot about 'old fashioned' home made sweets lately thanks to an upcoming birthday and what is probably the tightest budget I've had to work with yet! When I discovered this recipe on pinterest this morning I knew I had to give it a go...and it worked!!


Here's the original recipe and also the recipe halved if you don't want a big batch. Perfect if you just want to try it out and not risk a whole 4 cups of icing sugar...

Recipe 1
500g Icing Sugar 
2/3 c cocoa
1/4tsp salt
1/4c milk
2 tsp vanilla
1/2 c butter or marg

(Makes approx 36 pieces)

Recipe 2
250g icing sugar (2c)
1/3 c cocoa
pinch salt
2 TBLSP milk
1 tsp vanilla
1/4 c butter or marg 

(Makes approx 18 pieces)

Sift icing sugar and cocoa into a large bowl. Add salt.
Stir in milk and vanilla.
Place butter on top (don't melt it first)
Microwave 2 mins and then beat with a wooden spoon until smooth. You will have to work quickly.
Spread into slice tin and refrigerate 1 hour ( or 30mins if doing half batch.)

*You can add nuts or other extras like dried fruit at the final mixing stage.
*You can use mini muffin liners/tray instead of slice tin.
*If making half mix only spread out to half the length of your tray...easy one to forget!

In yummery: My daughter asked for this to be made for her party...enough said! This was an instant hit.
It doesn't use condensed milk so this is more frugal than regular fudge and is easily made gluten and lactose free.

Nothing bad to say about this recipe :)

May your nest be blessed,
Lisa